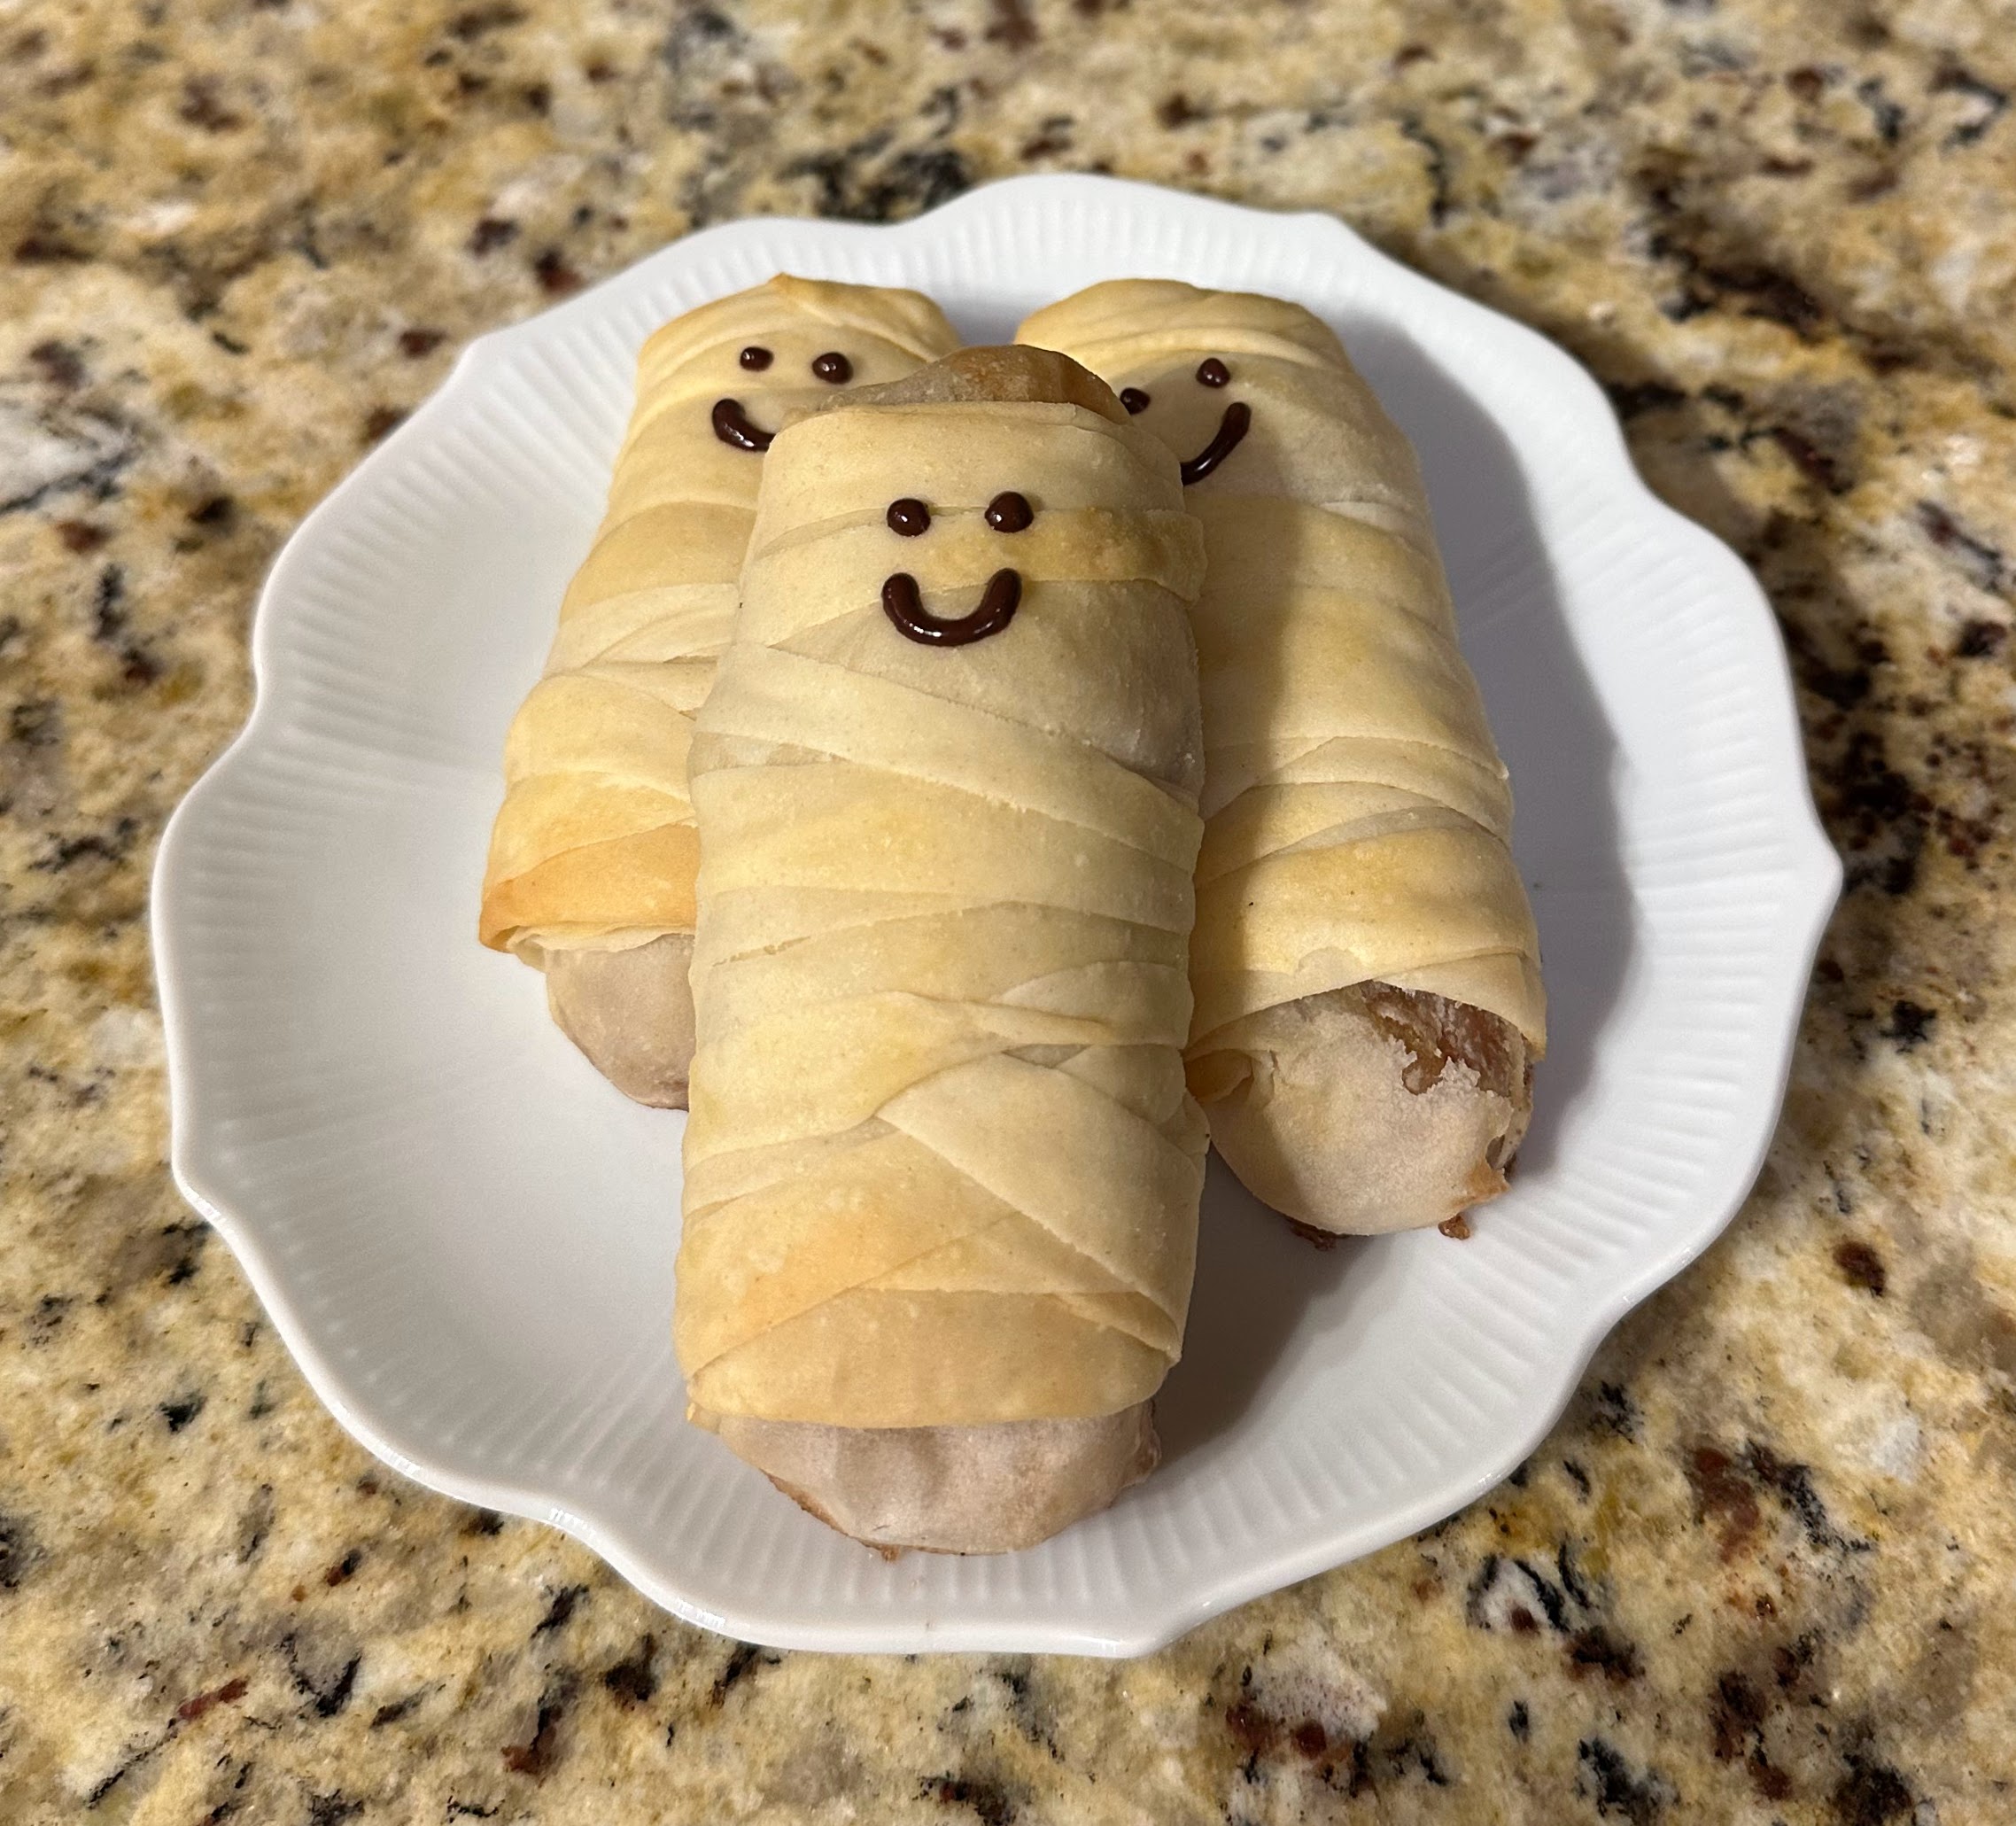
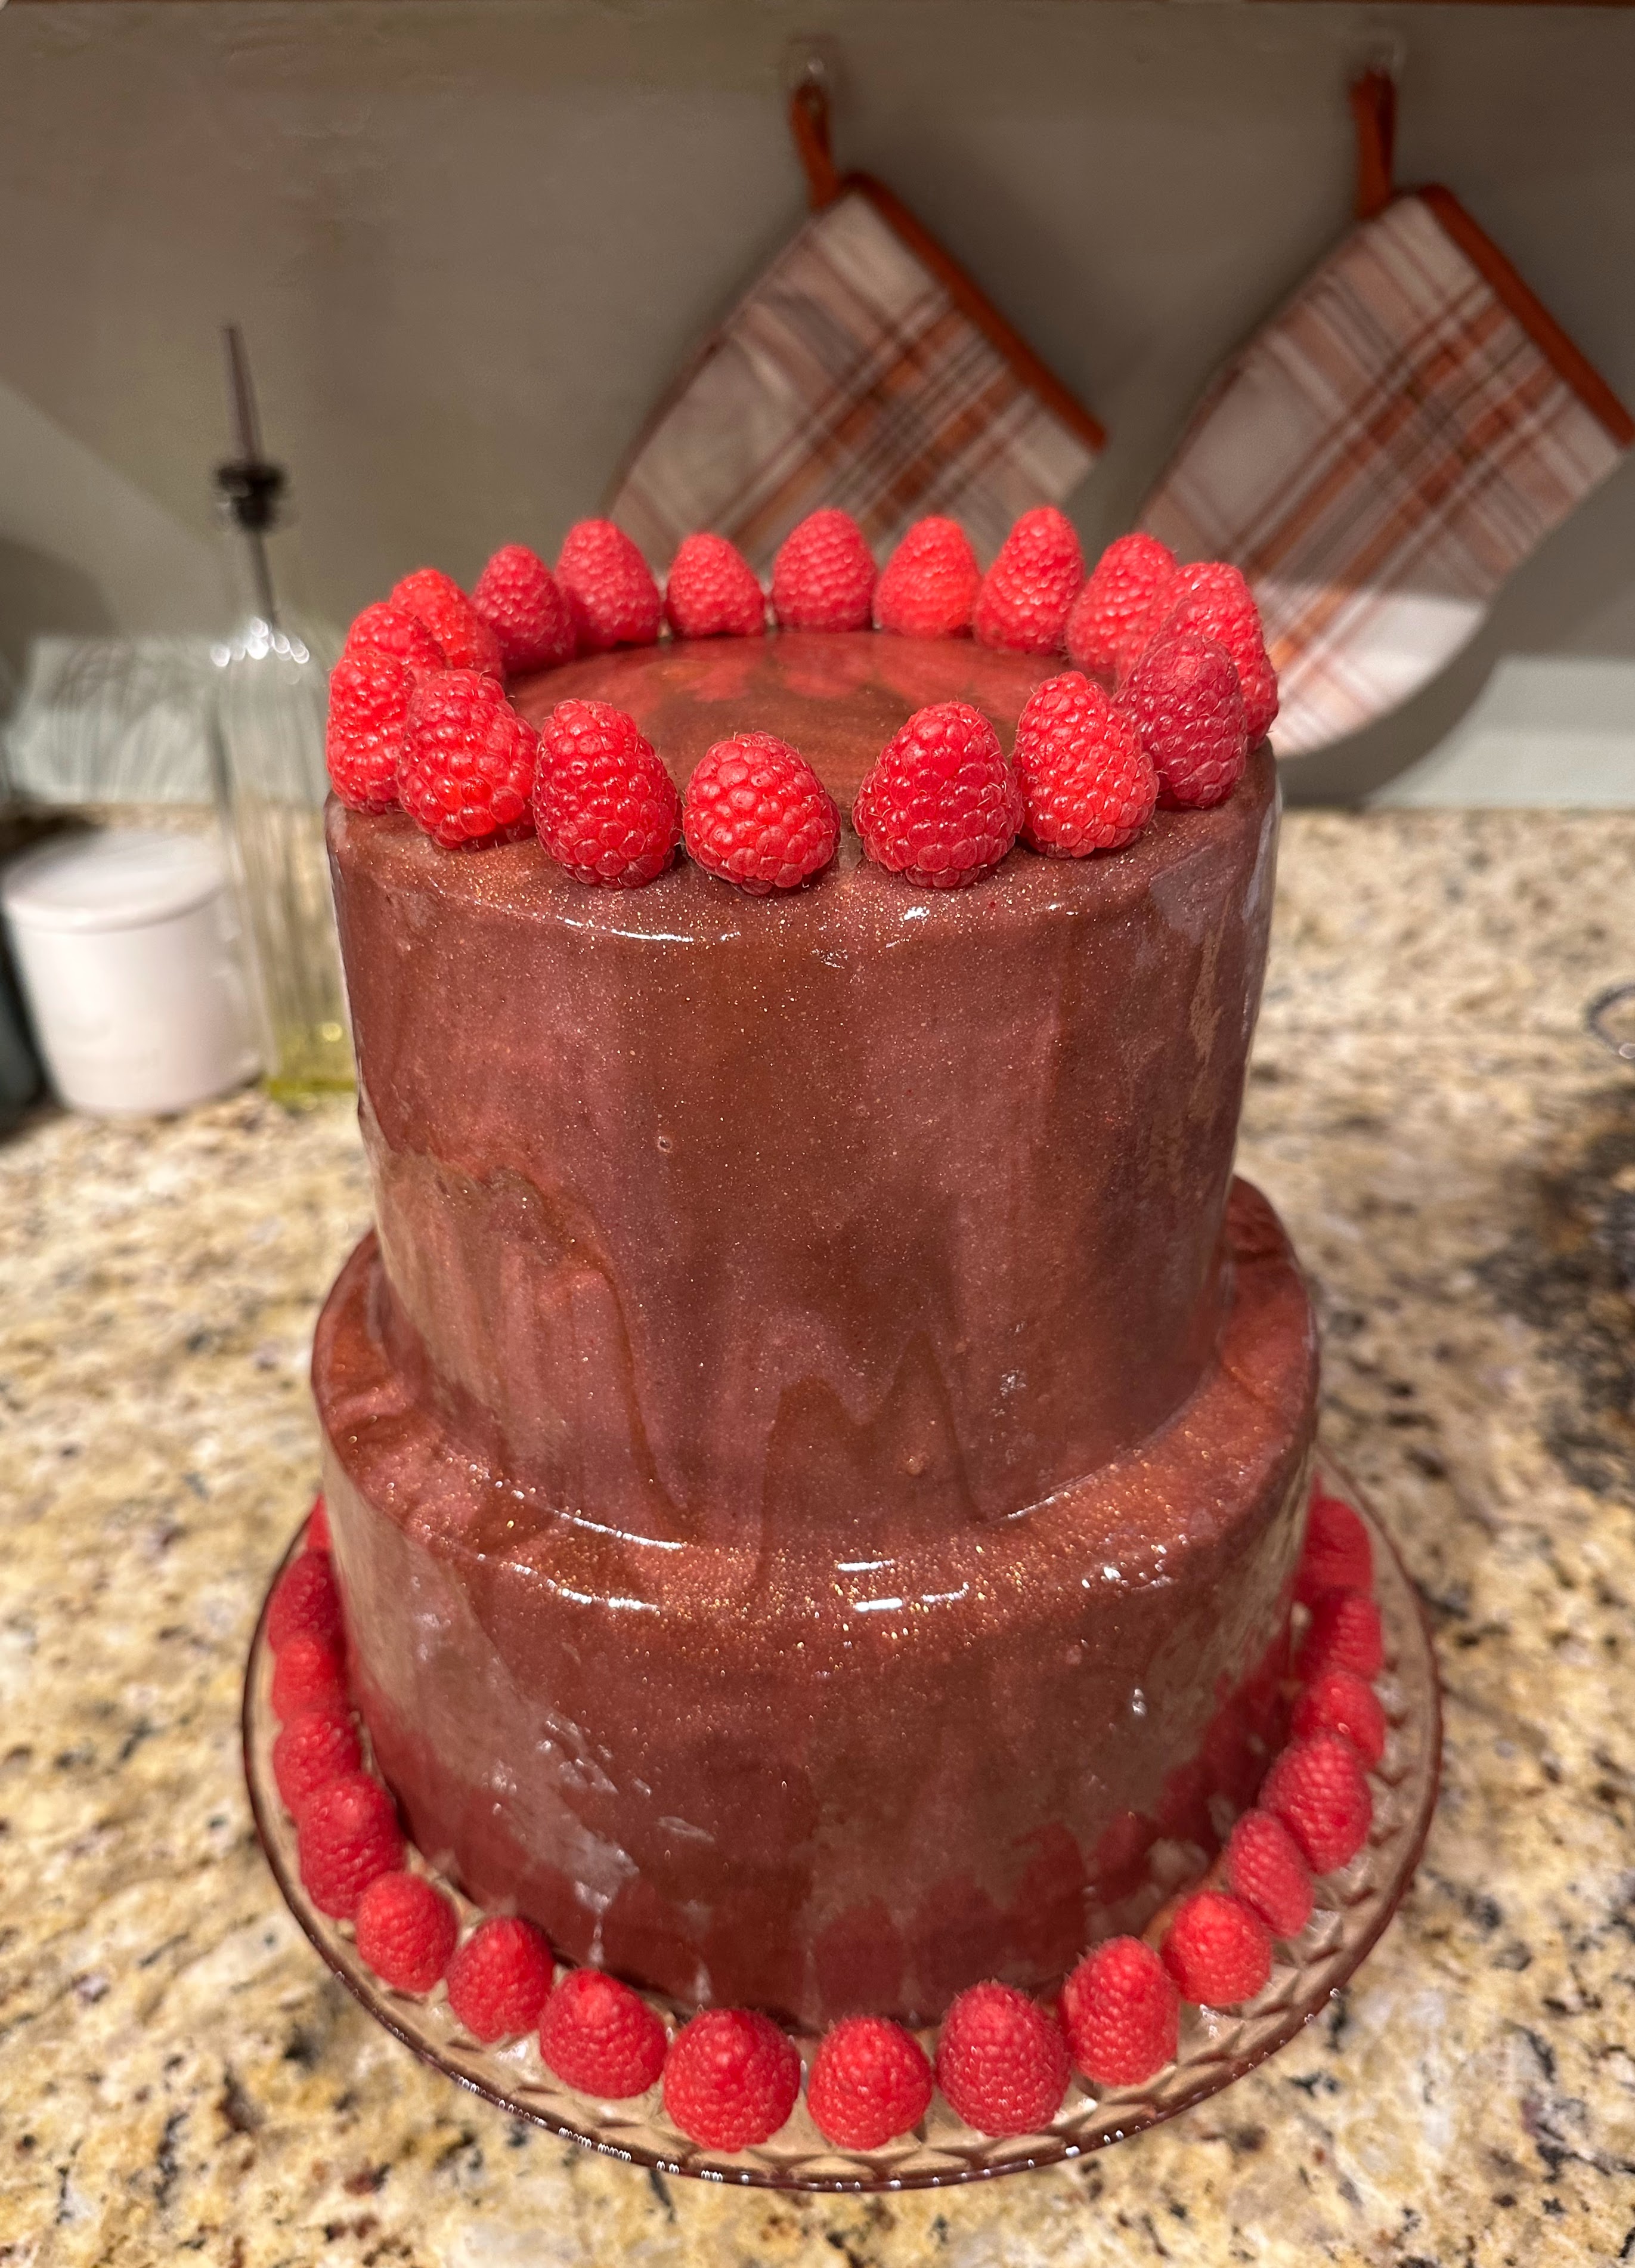
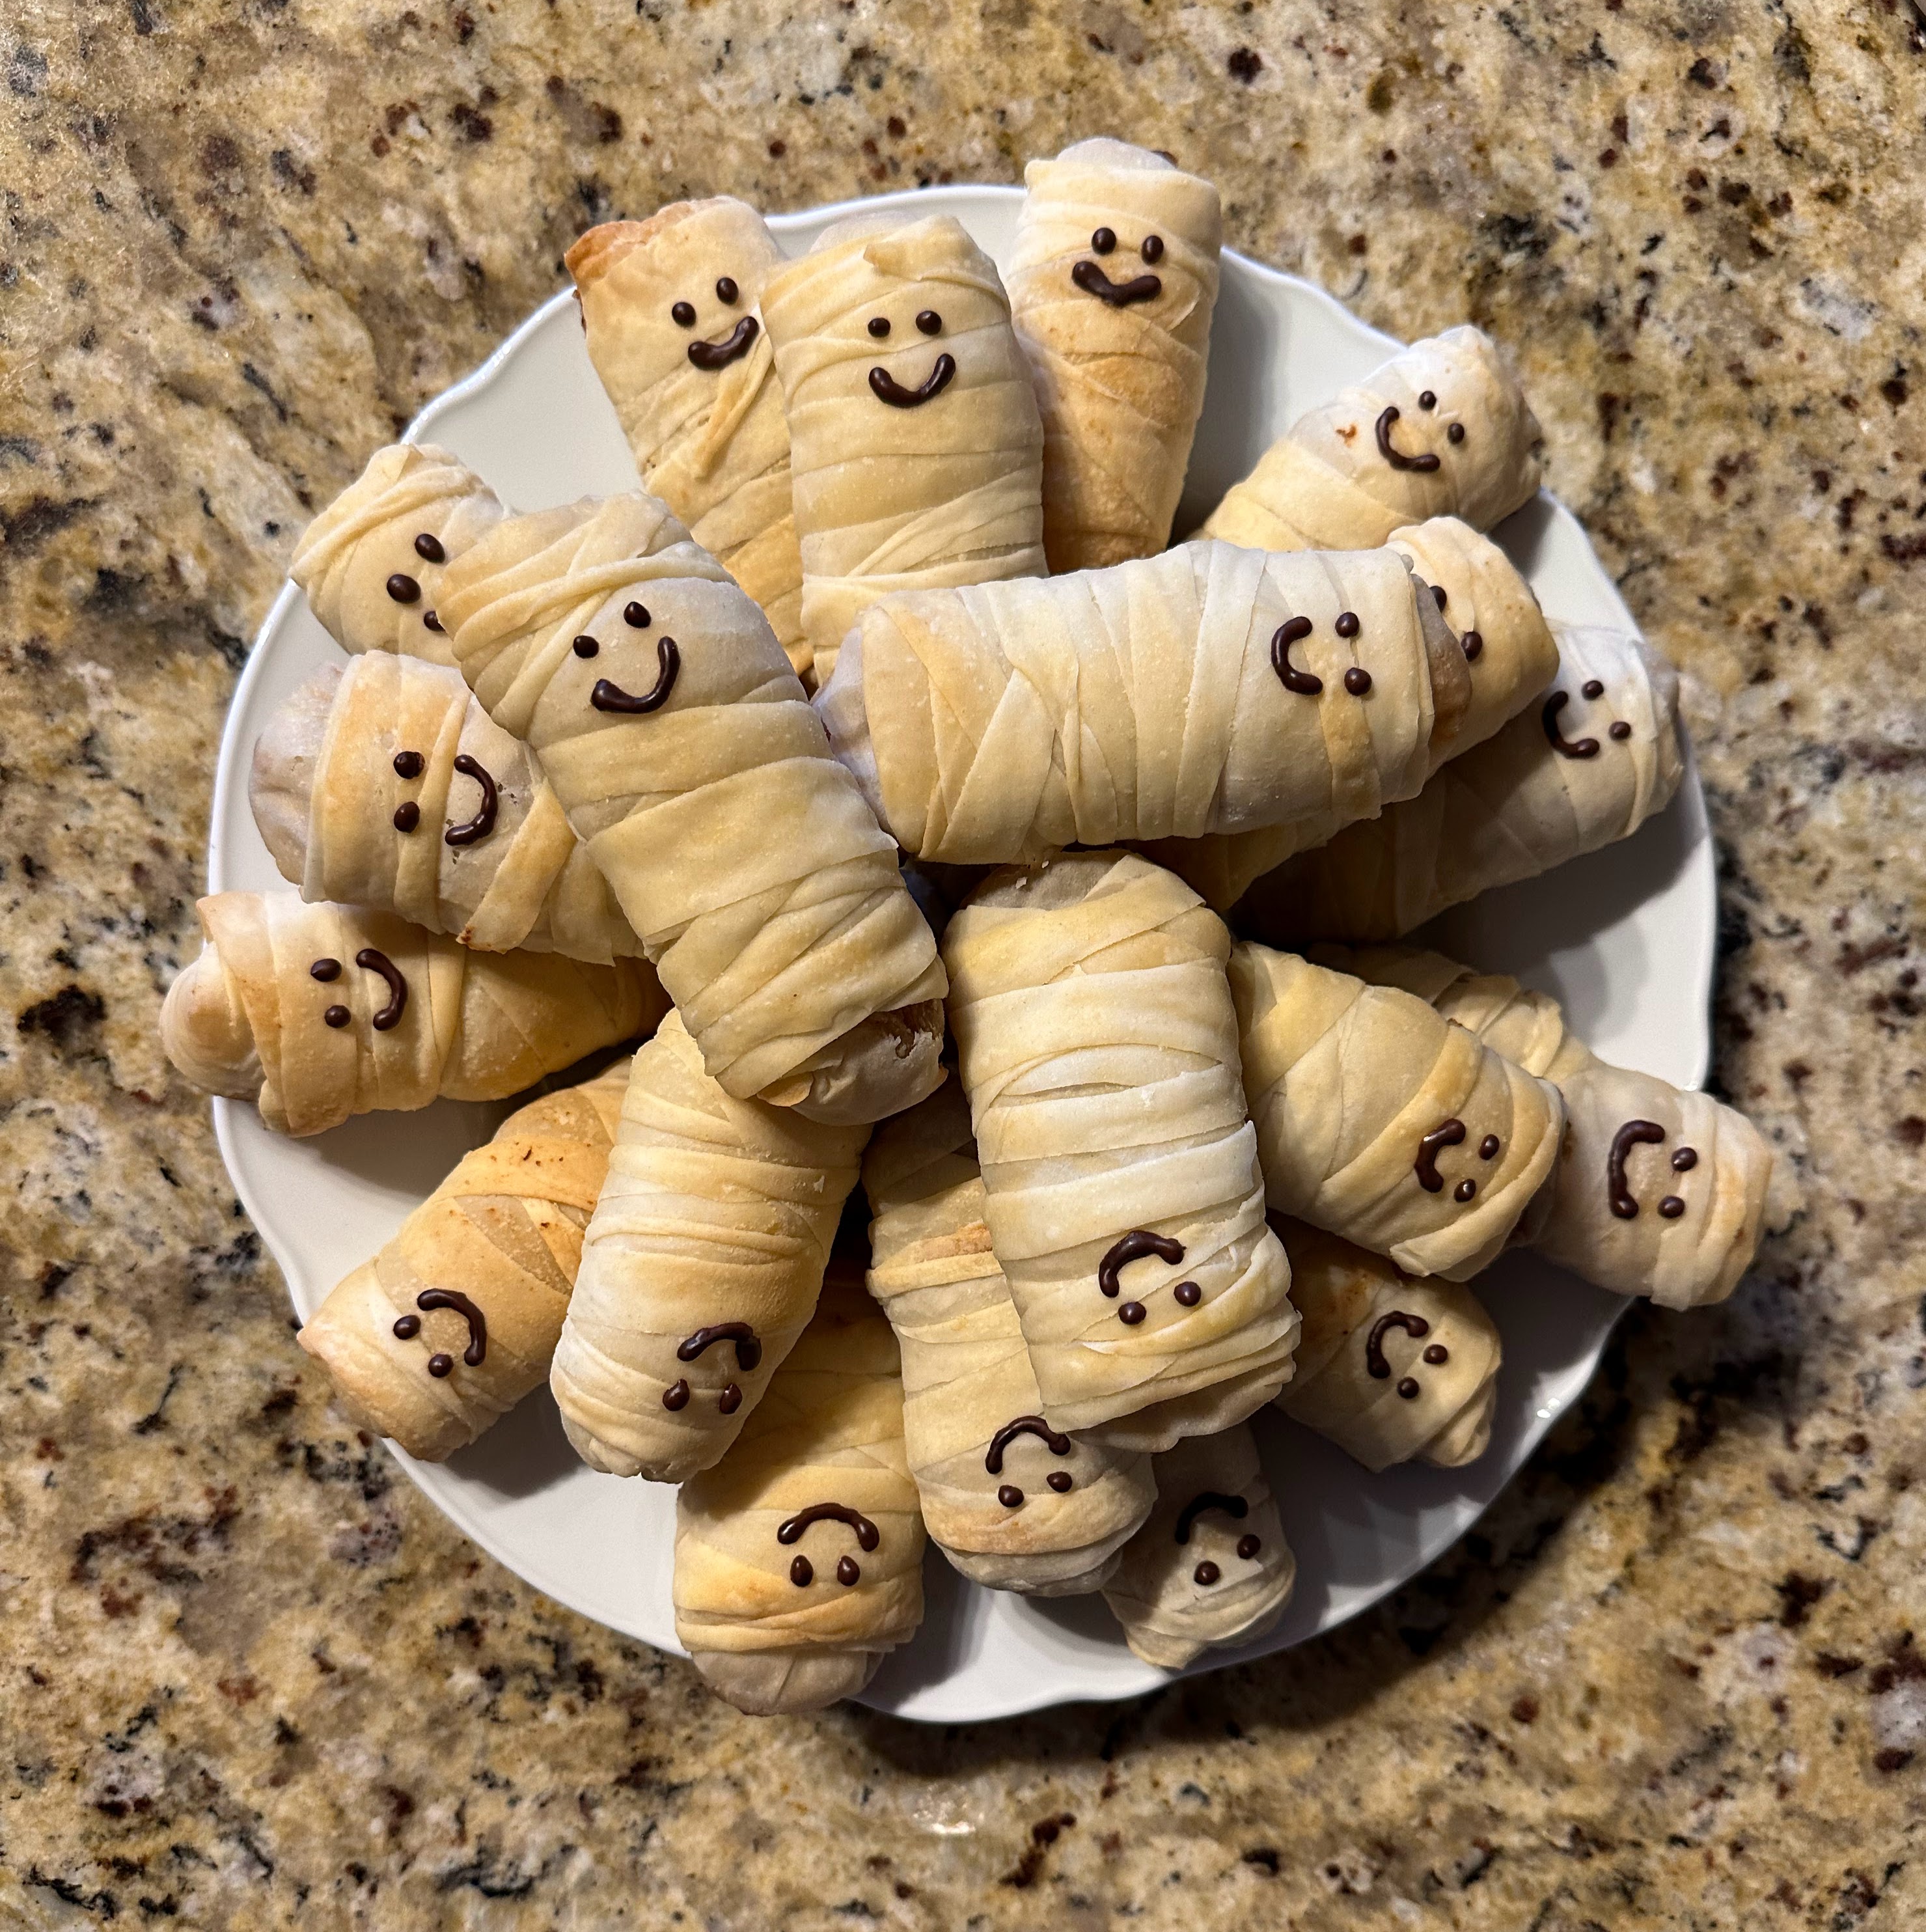
• My work hosted a Halloween baking competition this year, and I won! To be fair, I was the only one who brought a dessert… but who needs to know that? These Phyllo Apple Pie Mummies are light, flaky, and just sweet enough to steal the show at any Halloween party (or office bake-off).

    The crisp phyllo dough pairs perfectly with the warm, spiced apple pie filling, and wrapping them into little “mummies” makes them almost too cute to eat!

    Here’s a quick video of how I made the mummies!

    Ingredients

    Phyllo Dough

    • 2 cups flour
    • 5 tsp olive oil
    • 1/2 tsp salt
    • 3/4 cup warm water
    • 2 tsp white wine vinegar
    • 1 cup cornstarch
    • 4 tbsp flour
    • 1 cup butter (melted)

    Apple Pie Filling

    • 4 medium Gala apples, peeled and diced
    • 1/2 cup sugar
    • 2 tsp flour
    • 1/2 tsp cinnamon
    • 1/4 tsp nutmeg
    • Dash of ginger
    • Dash of cloves

    Garnish

    • Melted chocolate for piping faces

    Instructions

    1. Make the phyllo dough:
      • Dissolve salt in warm water, then add vinegar.
      • In a large bowl, make a well in the flour, pour in olive oil and water mixture, and mix together.
      • Knead on a floured surface for about 5 minutes, until smooth.
      • Wrap in plastic wrap and rest at room temperature for 1–2 hours.
    2. Prepare the apple pie filling:
      • Combine all filling ingredients in a saucepan over medium-low heat.
      • Cook for about 10 minutes, stirring often, until the apples are tender and the mixture thickens slightly.
      • Set aside to cool.
    3. Roll out the phyllo:
      • Form the rested dough into 20g balls (you should get about 30).
      • In a bowl, mix cornstarch and 4 tbsp flour.
      • Coat 5 dough balls in the mixture and keep the rest covered so they don’t dry out.
      • Roll each ball into a thin circle.
      • Stack 5 circles together, dusting generously with the cornstarch mixture between each layer.
      • Roll out the stack again, then carefully separate the layers.
      • Stack the layers again, dusting generously with the cornstarch mixture between each layer.
      • Roll out the stack again, then carefully separate the layers. They should be paper thin.
    4. Assemble the mummies:
      • Brush one phyllo sheet lightly with butter.
      • Spoon apple pie filling onto one side and roll it up like a burrito.
      • Repeat 3 more times, leaving one sheet of phyllo dough for “bandages.”
      • Cut the leftover sheet into thin strips, brush with butter, and wrap around the pastries like mummy bandages.
    5. Bake:
      • Preheat oven to 350°F.
      • Place mummies on a parchment-lined baking sheet about 2 inches apart.
      • Brush with butter and bake 25–30 minutes, until edges are golden brown.
      • Let cool completely.
    6. Decorate:
      • Melt chocolate and pipe on little faces or spooky smiles.
    7. Serve and enjoy!

    Notes

    • Serves about 25, perfect for a party or to share at the office.
    • If you’re short on time, you can use store-bought phyllo dough, just be sure to brush between each sheet with butter as you layer.
    • These are best enjoyed the same day but can be stored in an airtight container for up to two days.
    • Optional: dust with powdered sugar before serving for a spooky “mummy wrap” effect.
  • My family comes from the pumpkin capital of the world, and this fall we gathered for the local pumpkin festival. After returning home to Arizona I found myself missing all those cozy fall flavors. To bring a little piece of it back, I baked this pumpkin pie with a twist: butterscotch.

    I’ve always loved the deep, caramelized sweetness of butterscotch, and it pairs beautifully with pumpkin spice. The chips melt right into the filling, adding little pockets of butterscotch flavor that make this pie extra special. Finished with a light vanilla bean whipped cream, it’s fall comfort in every bite.

    Here’s a quick video of how I made the pie!

    Ingredients

    Pie

    • Pie crust dough – I use a recipe from Sally’s Baking Addiction (or the frozen Trader Joe’s crust if you want to keep things simple)
    • 1 (15 oz) can Libby’s pumpkin
    • 2/3 cup heavy cream
    • 1/2 cup milk
    • 3 eggs
    • 2/3 cup light brown sugar
    • 1 Tbsp cornstarch
    • 1/2 tsp salt
    • 1 1/2 tsp cinnamon
    • 1 tsp nutmeg
    • 1/2 tsp ginger
    • 1/4 tsp cloves
    • 2/3 cup butterscotch chips

    Whipped Cream Topping

    • 1 cup heavy whipping cream
    • 1 Tbsp powdered sugar
    • 1 tsp vanilla bean paste

    Instructions

    1. Preheat oven to 375°F. Butter a pie dish, roll out the pie dough, and press it into the dish.
    2. In a large bowl, whisk together the pumpkin, cream, milk, eggs, brown sugar, cornstarch, salt, and spices until smooth.
    3. Pour filling into the crust. Sprinkle butterscotch chips over the top—they’ll sink into the pie as it bakes.
    4. Cover the crust edges with foil or a pie crust shield. Bake for 25 minutes.
    5. Remove foil and bake for another 25 minutes. The center should still have a slight jiggle.
    6. Cool on a wire rack for 1 hour, then refrigerate at least 2 hours to set.
    7. For the topping: whip the heavy cream, powdered sugar, and vanilla until stiff peaks form.
    8. Spread or pipe the whipped cream over the cooled pie.
    9. Slice, serve, and enjoy!

    Notes

    • The butterscotch chips give the filling an extra-creamy, almost caramel-like flavor.
    • If you want a stronger butterscotch punch, melt a handful of chips and stir them into the filling before baking.
    • This pie is even better the next day once the flavors have had time to meld.
  • Dark Chocolate Raspberry Mousse Cake with Mirror Glaze

    A two-tier 70% cacao dark chocolate cake with a raspberry coulis filling and a mirror glaze on top

    My roommates and I have been watching The Summer I Turned Pretty together for the past few seasons, and when the finale rolled around this year, I knew we needed something special to celebrate.

    My favorite dessert combo is dark chocolate and raspberry, so when Jeremiah called for a dramatic two-tier 70% cacao cake with raspberry filling and a mirror glaze, I had to agree with him, though he’s wrong about just about everything else.

    I couldn’t find a chocolate cake recipe that highlighted 70% cacao, so I used King Arthur Baking’s tried-and-true chocolate cake (with coffee for depth) and layered it with a rich 70% dark chocolate mousse. For the finish, I made a glittery multicolored mirror glaze because honestly, those satisfying cake glaze videos never stopped being fun.

    This cake is a project bake, but if you love baking with friends, it’s worth every step.

    Here’s a quick video of how I made the cake!

    Ingredients

    Chocolate Cake

    I doubled this chocolate cake recipe from King Arthur Baking to make my 6 inch and 8 inch round tiers:


    Raspberry Coulis

    • 12 oz fresh raspberries
    • 3 Tbsp sugar
    • 2 Tsp lemon juice
    • Lemon zest (to taste)

    70% Cacao Chocolate Mousse

    • 1 cup hot water
    • ½ cup Dutch-process cocoa powder
    • 16 oz 70–80% dark chocolate (I used Ghirardelli 72% chips)
    • 4 cups cold heavy cream
    • 4 Tbsp confectioners’ sugar
    • 1 tsp pure vanilla extract

    Mirror Glaze

    • 1 cup cold water
    • 2 ½ cups sugar
    • 1 ½ cups light corn syrup
    • 1 cup sweetened condensed milk
    • 30 g unflavored gelatin (4 packs Knox gelatin powder)
    • 550 g quality chocolate (I used half dark, half white for a marbled look)
    • Food coloring or edible glitter (optional)
    • Fresh raspberries for garnish

    Directions

    Raspberry Coulis

    1. Add raspberries, sugar, lemon juice, and zest to a medium saucepan over medium-low heat.
    2. Gently mash berries with a spatula as they cook.
    3. Remove from heat once mixture begins to simmer.
    4. Blend until smooth, then strain to remove seeds.
    5. Let cool. Store in fridge or freezer until ready to use.

    Chocolate Mousse

    1. In a small bowl, whisk hot water and cocoa until smooth.
    2. Melt chocolate in a double boiler (or microwave in 30-second bursts, stirring each time).
    3. Stir cocoa mixture into melted chocolate until thick and smooth. Set aside.
    4. In a large bowl with a mixer, whip heavy cream, confectioners’ sugar, and vanilla until medium peaks form (about 3 minutes).
    5. Gently fold in chocolate mixture until combined (don’t overmix, you still want the whipped cream to be fluffy).
    6. Cover and refrigerate at least 2 hours, up to 2 days. Yields ~9 cups.

    Cake Assembly

    1. Once cooled, cut each cake into layers (I ended up with 4 cake layers per tier).
    2. For each layer:
      • Spread mousse evenly, leaving a shallow divot in the center.
      • Spoon in raspberry coulis, making sure mousse forms a wall to prevent spillover.
      • Top with another cake layer. Repeat until stacked.
    3. Coat assembled tiers with mousse, smoothing with a spatula.
      • Tip: Take your time here! The mousse layer must be as flat and even as possible. Any bumps or dips will show under the glaze since it’s reflective. If needed, freeze for 1-2 hours, then add a thin second coat to smooth imperfections.
    4. Freeze each tier at least 2 hours.
    5. Insert supports (I used bamboo skewers) into the bottom tier, then stack.
    6. Freeze assembled cake overnight before glazing.

    Mirror Glaze

    1. Bloom gelatin: sprinkle over cold water, let sit 10 min.
    2. In saucepan, heat sugar and corn syrup until bubbling. Remove from heat.
    3. Stir in sweetened condensed milk, then bloomed gelatin until dissolved.
    4. Melt chocolate and stir into gelatin mixture until smooth (avoid bubbles).
    5. Add food coloring/glitter if desired.
    6. Cool glaze to 96-100°F, strain, then let sit until 86-95°F.
    7. Place frozen cake on wire rack over a lined baking sheet.
    8. Pour glaze in a circular motion over cake, letting excess drip off.
    9. Transfer cake to serving plate, chill at least 2 hours to set.
    10. Garnish with raspberries and enjoy!

    Serving

    This cake is dramatic, decadent, and absolutely worth the effort; perfect for a finale watch party, birthday, or any occasion where dessert should be the star.